Fine art photography has always intrigued me. The minimalism, the dreamlike compositions, and the sense of artistic control over an image are all elements that I deeply admire. Inspired by the likes of Gary Gough and other fine art photographers, I finally took my first steps into this style of photography—though not without some apprehension.
It felt like a leap into the unknown, but on a spur-of-the-moment decision, I grabbed my camera and headed to Sandymount Beach. The overcast skies and high tide seemed like the perfect conditions to begin this journey. Little did I know, it would be a day filled with lessons, challenges, and moments of pure creative joy.
Lesson 1: I Think I Overexposed These a Little Too Much
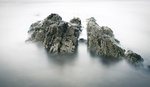
One of the first challenges I encountered was finding the right balance in exposure. In my initial attempts, I opted for an extremely long exposure, thinking it would create the soft, seamless look characteristic of fine art photography. However, I quickly realized that my exposure was too long, leading to a complete loss of texture in both the sky and the water. While this can sometimes work in favor of a clean aesthetic, I found that retaining some subtle details adds depth and realism to the final image.
I remember standing there, thrilled with the previews on the back of my camera, only to realize later that the long exposure had completely erased the texture in the sky and water. It was a humbling moment—a reminder that fine art photography isn’t just about creating a dreamy effect but also about preserving the essence of the scene. I know the glass-like water is an element of this style of photography, but this result left me feeling like I could have shot it on a white seamless backdrop.

The key takeaway here: Experiment with different exposure lengths, but be mindful of losing too much texture. A balance between smoothness and detail can elevate an image. Consider using neutral density filters to control light without sacrificing texture, and always review your shots in-camera to ensure you’re capturing the right amount of detail.
Lesson 2: Testing my Post-Production Skills
Shooting the images was just the beginning—post-processing played a huge role in refining the final look. From removing unwanted elements to adjusting gradients, I spent hours fine-tuning each image. One of my biggest struggles was achieving that seamless, blended-horizon effect. If I talked about all the trial and error I had in Photoshop, you'd be reading this for a month.
In one of my Pigeon House chimney shots, I had to remove land from the frame to create a more isolated, artistic composition. This was a challenge, but it forced me to push my Photoshop skills further. I also experimented with vignettes and gradients to subtly guide the viewer’s eye to the main subject. The gradient at the top and bottom of the image helped darken the frame, drawing attention to the iconic chimneys and that pop of red that made the scene so striking.
But post-processing isn’t just about technical skills—it’s also about patience. There were moments when I felt frustrated, staring at the same image for hours, trying to get it just right. Yet, those moments of struggle often led to breakthroughs. For instance, I discovered that subtle adjustments to contrast and brightness could completely transform the mood of an image, making it feel more ethereal and cohesive.

The key takeaway here: Fine art photography is just as much about the edit as it is about the capture. Don’t be afraid to take creative liberties in post-production, but also remember that less is often more. Sometimes, a few small tweaks can make a world of difference.
Lesson 3: Looking at Frames Differently
One of my most successful images—and one of my favorites—came from a simple but powerful realization: composition makes or breaks an image. In my final shot at this location, I positioned the Sandymount Baths just below the horizon, creating a sense of vastness and isolation. I also did this to make the post-production a little easier. I thought having nothing interfering with the horizon line would make it simpler to create that seamless blend. The dark clouds streaked across the sky, almost as if they were pointing down to the focal point. It was a moment of clarity, where everything in the frame felt intentional and harmonious.

But composition isn’t just about where you place your subject—it’s also about how you frame the entire scene. In these examples from another location, I found that working with leading lines, such as the curve of a shoreline or the angle of a staircase, helped create a sense of movement and flow. Additionally, a pop of color, such as the red of a lighthouse against a moody gray sky, made a huge difference in creating a visually compelling shot.

The key takeaway here: Plan your compositions with intention. Pay attention to subject placement, leading lines, and how elements interact within the frame. Don’t be afraid to experiment with different angles and perspectives to find the most impactful composition.
Lesson 4: Not Every Image Needs Extreme Editing
While the goal of fine art photography is often to create a surreal, clean look, not every image requires heavy-handed edits. One of my favorite shots was taken with my Sigma 100-400mm lens, capturing the Poolbeg Lighthouse. Initially, I tried to blend the horizon, but the results didn’t feel natural—or I simply didn't have the required skills to do so yet. Instead, I left the background as it was, and the contrast between the lighthouse and the dark background and moody sky made for a shot I was thrilled with. The long exposure smoothed out the water, creating a gradient from the murky gray of the Irish Sea to a lovely green, while the red of the lighthouse popped off against the background, Howth.
This experience taught me that sometimes, the scene itself is strong enough to stand on its own. Over-editing can strip away the natural beauty and authenticity of a photograph, leaving it feeling sterile or artificial.

The key takeaway here: Knowing when to edit and when to let the natural elements shine is an important skill in fine art photography. Trust your instincts and don’t feel like you have to manipulate every image to fit a specific aesthetic.
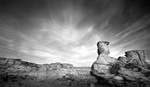
Lesson 5: Black and White Can Transform an Image
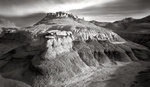
This past year or so, I’ve been learning more about black and white photography, and as part of my ongoing exploration, I decided to convert a few of my fine art shots into monochrome. The results were striking, and I am delighted to have used this image to convert. Without color, the emphasis shifted to shapes, textures, and contrast, creating an entirely new mood.
This particular image—the stairwell leading into the water—worked exceptionally well in black and white. It felt timeless, almost ethereal, as if it could have been taken decades ago. I found myself flipping between the color and black-and-white versions, unsure which I liked better—a testament to how powerful this medium can be. But as I embrace black and white processing more, I still find myself drawn to the color version (shown above). What do you think?

Final Thoughts: A Journey Worth Taking
This experiment with fine art photography was as much an emotional journey as a technical one. There were moments of pure joy—like when I saw the previews on the back of my camera and knew I was onto something special. But there were also moments of frustration—like when I realized my long exposures had erased all texture in the sky and water, which I wasn't expecting at all. Yet every challenge taught me something new. Letting go of the need for perfection freed me to embrace the process, and by the end of the day, I felt a deep sense of accomplishment. Fine art photography isn’t just about creating beautiful images—it’s about seeing the world in a new way and finding beauty in simplicity.
If you’re considering diving into fine art photography, my biggest advice is to experiment. Try different exposure times, play around in post-processing, and don’t be afraid to step outside your comfort zone. Each image is an opportunity to refine your skills and develop your own artistic voice.
Let me know in the comments—have you tried fine art photography? What challenges have you faced, and what lessons have you learned? I'd absolutely love to hear back from the community, particularly if you have any tips or tricks we could all benefit from.
I would love to hear your thoughts on this style of photography.


I'd never really explored the world of fine art photography. This is a great article to understand what it is and how the aesthetic is created. Very educational, thank you! And stunning images, very ethereal.
Thanks so much for the kind words and comment. Yes it is a worth while endeavor seeking out subjects that could lend themselves well to this style of photography. Cheers 😀
In my opinion, fine art photography is always about the printed image. No matter how good a file looks after Photoshop editing, it transforms the moment you try printing it on quality paper and in the proper size. But even that is just one more stage, far from the final result. Much depends on the choice of print size and how the final artwork is mounted, framed, and presented.
And that’s just the technical side. Fine art photography is far more complex when it comes to meaning. It’s about conveying emotion, provoking thought, and offering space for interpretation. A truly powerful image continues to unfold over time, inviting the viewer into a deeper dialogue.
Wonderful comment Alvin, thanks so much 😊 printing is something I seldom do at the best of times (which someday I hope to change) but I can totally understand what you are saying for sure!
This whole creative journey for me has been such a wonderful learning experience and I am super excited to seek out more potential subjects that would suit this style of shooting/processing.
"A truly powerful image continues to unfold over time, inviting the viewer into a deeper dialogue" I love this, and couldn't agree more.
Cheers 😀
I always wonder what is the definition of fine art photography. What makes it fine? Interesting read. :D
I fully agree. Way too often, people label their work as “fine art” when, clearly, the work isn’t. In any discussion of this, the debate always returns to “art is in the eye of the beholder.”
Fine art photography is, first and foremost, a form of personal artistic expression — a cohesive body of work or a series of images driven by a unifying concept and purpose. It stands in contrast to decorative art and other forms of photography created for applied or commercial purposes.
Think of the difference between a poem and a greeting card. Both use words, but one aims to move you or make you think — that’s what “fine” is about.
There is no finite definition to the term “Fine Art Photography’ other than it is not representational photography such as photojournalism, advertising, Wedding, Event, etc.; which means that any photograph produced only for visual “aesthetic" purpose could be considered “fine Art”
Like the term “Art” in and of itself, it’s not weather it is, or isn’t, but rather if it's “good, or “bad", and that is often in the eye of the beholder.
Thanks a million for the comments and insights, I do wonder that very same question myself 😅 for me I think it's the surrealism of an image that makes it fit that mould. As you all say indeed, the eye of the beholder is really where the liking or disliking of an images falls.
I knew going into the little experiment that what ever I ended up creating wouldn't be to everyone's taste or indeed perhaps even my own. I am just delighted to have pushed my own boundaries with my camera and learned many the lesson along the way 👍